> ## Documentation Index
> Fetch the complete documentation index at: https://help.berocker.com/llms.txt
> Use this file to discover all available pages before exploring further.
# Telnyx - Account Setup & Team Management
> Complete guide to verifying your Telnyx account and managing team members with the right roles.
***
### Why This Matters
Verification unlocks full access to Telnyx features—getting you past trial limitations and into trusted account status.\
Team management ensures the right people have the right level of access, such as inviting developers to handle API and integration work without exposing billing controls.
***
## Part 1: Account Verification
### Overview of Steps
1. Sign up and confirm your email
2. Upgrade from trial to full account
3. Enter personal and business details
4. Complete phone verification
5. Set up two-factor authentication (2FA)
6. Perform KYC (Know Your Customer) identity verification
7. Wait for approval (usually within 24 hours)
8. Confirm full verification in your Account Level section
### Step-by-Step Instructions
#### 1. Sign Up & Email Confirmation
* Visit the **Telnyx sign-up page**, enter your details, and confirm your email.
* After verification, you’ll land on the dashboard.
#### 2. Start the Upgrade
* Click the **Trial-Upgrade** button at the top right.
#### 3. Provide Business Information
* Input your personal and business details, including your **Business Tax ID**.
#### 4. Complete Payment & Phone Verification
* Pay the small upgrade fee.
* Enter your phone number for verification.
#### 5. Set Up Two-Factor Authentication (2FA)
* Choose between a **TOTP app** (e.g., Authenticator) or **SMS/Call**.
* Save your **backup code** somewhere safe.
#### 6. Submit KYC Documents
* Upload a picture of yourself and your ID.
* This step only happens once.
#### 7. Wait for Approval
* Verification review usually takes up to **24 hours**.
#### 8. Verify Completion
* Go to **Account Level** and confirm all green checkmarks.
## Watch the Walkthrough
## Part 2: Team Management – Adding a Developer
### Overview of Steps
1. Log in to the Telnyx Portal
2. Navigate to **Account Settings → Team**
3. Click **Invite Team Member**
4. Enter the new member’s email
5. Assign the **Developer** role
6. Send the invitation
7. Member accepts and joins your account
### Step-by-Step Instructions
#### 1. Log In to Telnyx Portal
* Visit [Telnyx Portal](https://portal.telnyx.com/) with your admin or owner credentials.
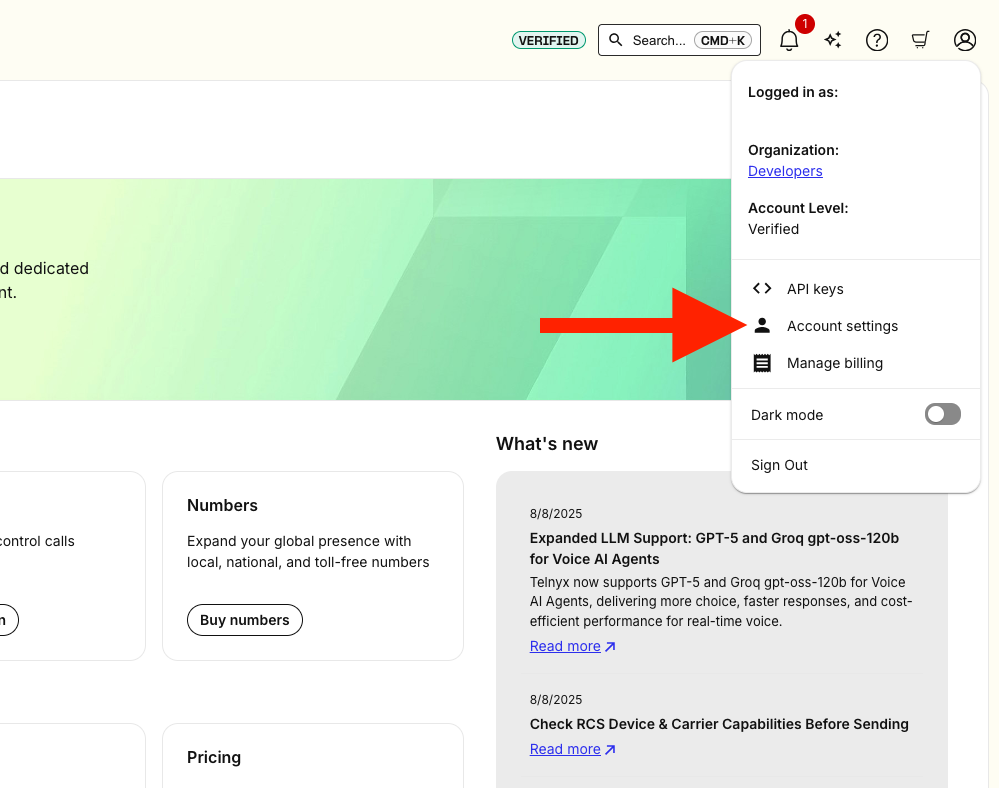
#### 2. Go to Organization and Members
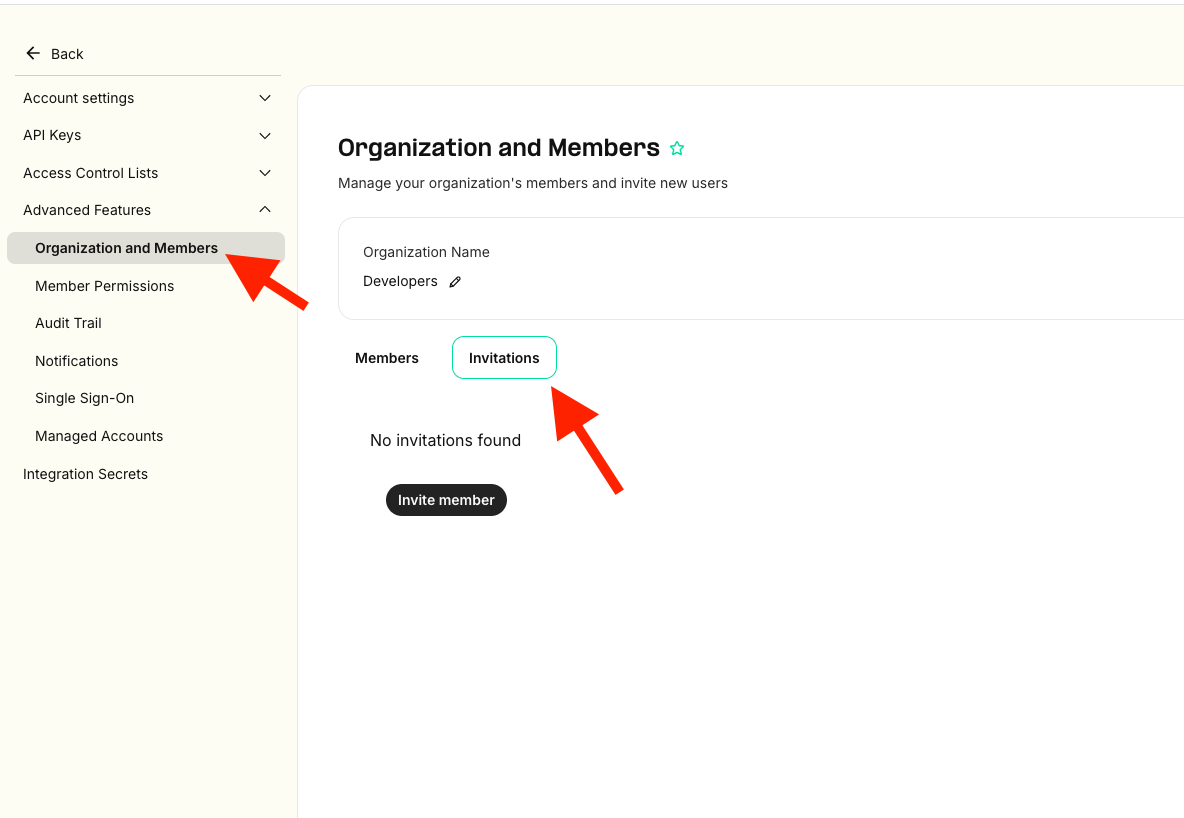
* In the left-hand sidebar, click **Account Settings → Advanced Features → Organization and Members**.
* This shows all current team members.
#### 3. Invite a New Member
* Click **Invite Team Member** and enter their **email address**.
#### 4. Send Invitation
* Click **Send Invite**.
* The user receives an email to join.
#### 5. Member Accepts
* After accepting, they appear in your **Team Members** list.
***
 #### 3. Invite a New Member
* Click **Invite Team Member** and enter their **email address**.
#### 3. Invite a New Member
* Click **Invite Team Member** and enter their **email address**.
 #### 4. Send Invitation
* Click **Send Invite**.
* The user receives an email to join.
#### 5. Member Accepts
* After accepting, they appear in your **Team Members** list.
***
#### 4. Send Invitation
* Click **Send Invite**.
* The user receives an email to join.
#### 5. Member Accepts
* After accepting, they appear in your **Team Members** list.
***