> ## Documentation Index
> Fetch the complete documentation index at: https://help.berocker.com/llms.txt
> Use this file to discover all available pages before exploring further.
# Integrating with Lead Providers & Website
> Adding a Lead Source to BeRocker CRM and integrating with Lead Providers and your website
This guide explains how to connect your lead provider or website form to **BeRocker CRM** by sending `POST` requests. Follow the steps carefully to ensure your leads are captured correctly.
## 1. Create a Lead Source & Get Endpoint URL
### Step 1 — Settings page
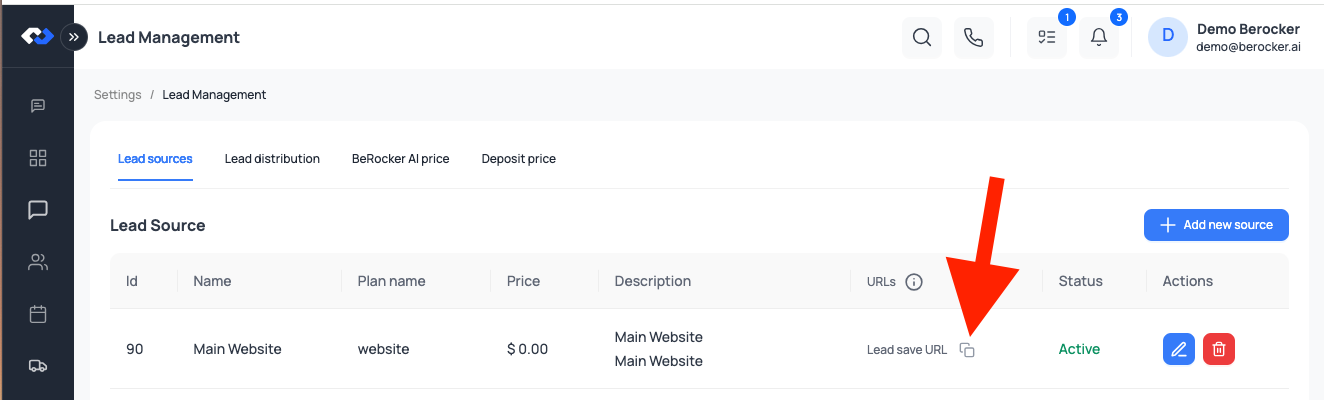
Go to **Settings → Lead Management → Lead Sources** in your BeRocker CRM.
### Step 2 — Add New Source
Click **Add New Source** and give it a name (e.g., `Main Website`).
* **Required:** Name
* **Optional:** (Only when connecting with Lead Source Provider)
* **Plan Name** — If your lead provider specifies a plan
* **Price** — If your provider charges per lead
### Step 3 — Copy Endpoint URL
After saving, copy the **Endpoint URL** from the **URLs** column using the copy icon.
 ***
## 2. Request Headers
When sending a `POST` request, include the following header:
```http theme={null}
Content-Type: application/json
```
Since your CRM account generates a **unique URL for each lead source**, basic authentication is already built in. You don’t need to provide additional credentials — simply use the provided URL.
## 3. JSON Payload Structure to follow
Most lead providers (e.g., MessagePlan, BATS) require this format:
```json theme={null}
{
"first_name": "John",
"last_name": "Doe",
"email": "user@example.com",
"phone": "5551234567",
"origin_city": "Los Angeles",
"origin_state": "CA",
"origin_postal_code": "90001",
"destination_city": "Miami",
"destination_state": "FL",
"destination_postal_code": "33101",
"vehicles": [
{
"vehicle_model_year": 2020,
"vehicle_make": "Toyota",
"vehicle_model": "Camry",
"vehicle_inop": false,
"vehicle_type": "Car"
}
],
"ship_date": "2025-03-27",
"transport_type": "open",
"comment_from_shipper": "Please call after 5 PM"
}
```
## 4. Example Request
```json theme={null}
curl -X POST "https://your-endpoint-url" \
-H "Content-Type: application/json" \
-d '{
"first_name": "John",
"last_name": "Doe",
"email": "user@example.com",
"phone": "5551234567",
"origin_city": "Los Angeles",
"origin_state": "CA",
"origin_postal_code": "90001",
"destination_city": "Miami",
"destination_state": "FL",
"destination_postal_code": "33101",
"vehicles": [
{
"vehicle_model_year": 2020,
"vehicle_make": "Toyota",
"vehicle_model": "Camry",
"vehicle_inop": false,
"vehicle_type": "Car"
}
],
"ship_date": "2025-03-27",
"transport_type": "open",
"comment_from_shipper": "Please call after 5 PM"
}'
```
## 5. Server Responses
**Successful Submission:** The server will return an HTTP status 200 OK along with a JSON response confirming the lead receipt.
• **Error Handling:** In case of errors, the server may return:
• 400 Bad Request — Incorrect request format.
• 401 Unauthorized — Authentication issues.
• Other HTTP error codes along with an appropriate error message.
## 6. Accepted vehicle type values
```bash theme={null}
sedan
Car
Boat
Motorcycle
Pickup
pickup_2_doors
SUV
Van
RV
Travel Trailer
ATV
Convertible
Coupe
Other
```
## 7. Accepted Transport Types
```bash theme={null}
open
enclosed
```
✅ That’s it! You’re now ready to send leads directly into BeRocker CRM.
***
## 2. Request Headers
When sending a `POST` request, include the following header:
```http theme={null}
Content-Type: application/json
```
Since your CRM account generates a **unique URL for each lead source**, basic authentication is already built in. You don’t need to provide additional credentials — simply use the provided URL.
## 3. JSON Payload Structure to follow
Most lead providers (e.g., MessagePlan, BATS) require this format:
```json theme={null}
{
"first_name": "John",
"last_name": "Doe",
"email": "user@example.com",
"phone": "5551234567",
"origin_city": "Los Angeles",
"origin_state": "CA",
"origin_postal_code": "90001",
"destination_city": "Miami",
"destination_state": "FL",
"destination_postal_code": "33101",
"vehicles": [
{
"vehicle_model_year": 2020,
"vehicle_make": "Toyota",
"vehicle_model": "Camry",
"vehicle_inop": false,
"vehicle_type": "Car"
}
],
"ship_date": "2025-03-27",
"transport_type": "open",
"comment_from_shipper": "Please call after 5 PM"
}
```
## 4. Example Request
```json theme={null}
curl -X POST "https://your-endpoint-url" \
-H "Content-Type: application/json" \
-d '{
"first_name": "John",
"last_name": "Doe",
"email": "user@example.com",
"phone": "5551234567",
"origin_city": "Los Angeles",
"origin_state": "CA",
"origin_postal_code": "90001",
"destination_city": "Miami",
"destination_state": "FL",
"destination_postal_code": "33101",
"vehicles": [
{
"vehicle_model_year": 2020,
"vehicle_make": "Toyota",
"vehicle_model": "Camry",
"vehicle_inop": false,
"vehicle_type": "Car"
}
],
"ship_date": "2025-03-27",
"transport_type": "open",
"comment_from_shipper": "Please call after 5 PM"
}'
```
## 5. Server Responses
**Successful Submission:** The server will return an HTTP status 200 OK along with a JSON response confirming the lead receipt.
• **Error Handling:** In case of errors, the server may return:
• 400 Bad Request — Incorrect request format.
• 401 Unauthorized — Authentication issues.
• Other HTTP error codes along with an appropriate error message.
## 6. Accepted vehicle type values
```bash theme={null}
sedan
Car
Boat
Motorcycle
Pickup
pickup_2_doors
SUV
Van
RV
Travel Trailer
ATV
Convertible
Coupe
Other
```
## 7. Accepted Transport Types
```bash theme={null}
open
enclosed
```
✅ That’s it! You’re now ready to send leads directly into BeRocker CRM.